
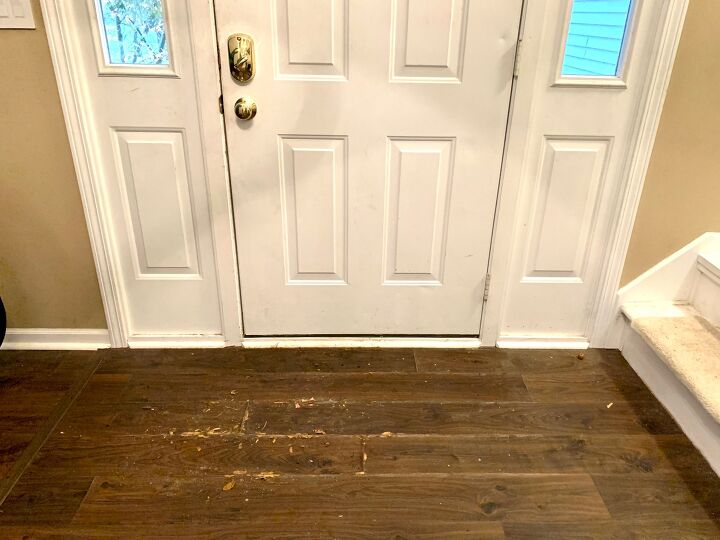
See the word “rug” in my title? Remember what our cat did to them? Here’s another house improvement that had to be undertaken because Lucky has little regard for floor coverings. And I thought I was safe this time, folks! We had a large entry mat that was rubbery and patterned with gaps and swirls, so it was not an enticing place to pee! But our grouchy old man found a way to balance precariously and go about his business anyway, damaging the laminate flooring beneath a little more each time.
Finally, I couldn’t take it anymore and became concerned about our subfloor. So, what do we do? This is our main entry, so we wanted to include something that would be suitable for wet and muddy shoes. We eventually want to install excellent wood flooring throughout the main level, but we aren’t ready to spend the money just yet, and I needed something more durable for this entry point anyhow.
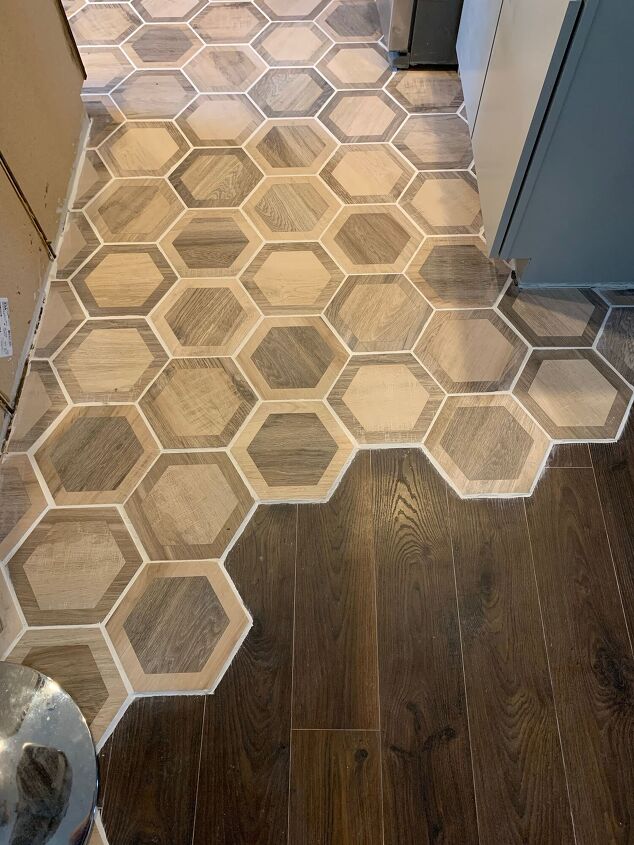
Hometalk recommends! Feeling inspired? Upgrade your entryway floor with these hexagon tiles that Amazon customers recommend! (I’ll spare you the close-up photo, but you get the point.) My spouse and I both agree that most tiled entries appear out of date and/or are simply not our style. But what if I did something here that matched what I did in our kitchen? I’d cut the laminate flooring into hexagon tiles and install them like a puzzle, combining the two types of flooring into a cool edge.
I could utilize the same tile and approach here at our entry, which would help save us from having too many distinct types of flooring on this main level of our home. I already know that this porcelain tile is long-lasting, easy to clean, and sufficiently textured to prevent slipping. The tile in our entryway would not have to be extensive, but could simply cover enough of the floor to act as an entry “rug” (as well as remove the ruined flooring).
So, that was my strategy. I needed to get rid of the cat’s trash, and this seemed like a small, manageable undertaking following my large bathroom remodel! It also helped because I already had all of the supplies except for the tile, making this a relatively inexpensive fix. (The $250 listed for this project assumes you have to buy everything from start. The tile cost only a bit more than $100.Supplies:
Hexagon floor tile (mine came from Mission Stone & Tile). Requirements: – AquaDefense or Schluter membrane – Rapid-setting thin set mortar. Grout Caulk
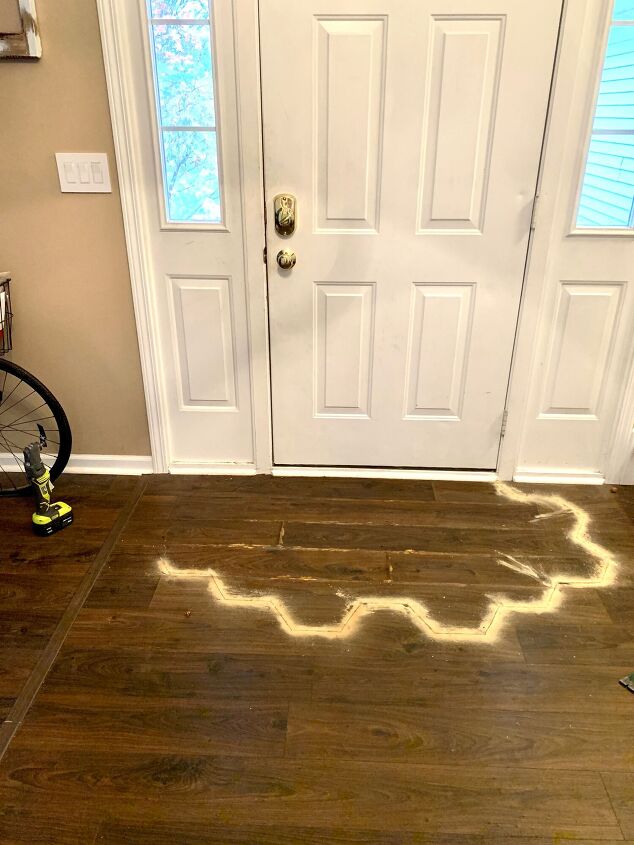
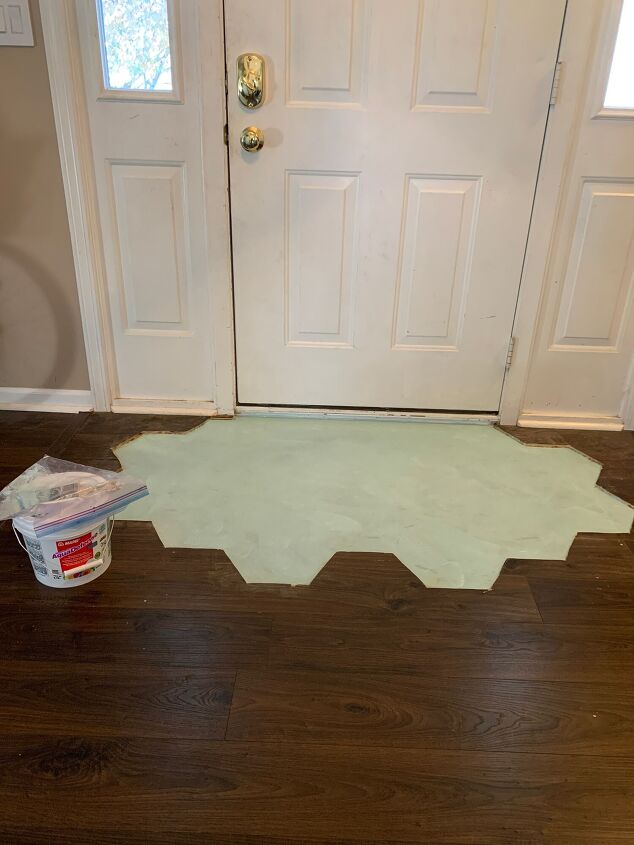
Step 1: Plan the tile layout and outline. When my tile arrived, my 4-year-old and I had a great time planning the shape of the tiled entry. We constructed some fun shapes, but I ended up laying the tile directly over the damaged area of the floor (after cleaning it as best I could).
Trending Videos. I had guessed accurately (sigh of relief) that we’d only need one box. I spaced the tiles exactly as I intended to grout them, and I made sure to leave a tile to cut for my infill pieces against our door. With the tiles in place, I took a Sharpie marker and drew an outline of this layout directly on the floor. I made sure to sketch extensively around the tiles’ edges, providing enough area to modify the tiles slightly if necessary.
This would also allow me to caulk between the tiles and the existing flooring, just as I would grout the gaps between the tiles themselves. After finishing this outline, I carefully returned the tiles to a pile. Step 2: Remove old flooring. This section was filthy and disgusting. However, if your flooring isn’t covered in grumpy old cat fur, you should be alright. Moving along my sketched line, I chopped the old flooring with my oscillating saw. This small tool is absolutely one of my faves, and it’s simple to make excellent clean cuts in all the hexagon corners.
You can also use a circular saw to make long, straight cuts. If you do this, make sure the depth is set to only cut through your flooring, not the subfloor. I used a circular saw in this manner when renovating our kitchen, and it is definitely faster! However, for this project, my circular saw was out of operation. Oh well. I required my oscillating tool for all of the corners and locations near the wall/door.
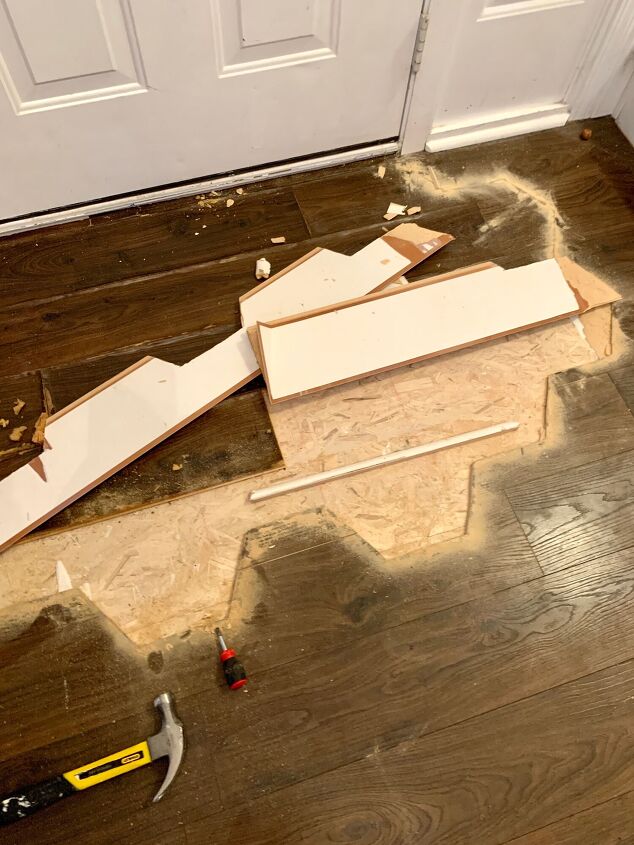
Once my cutting was finished, I used a hammer to pry up one of the boards along my cut line. The flooring was then easily disassembled and removed, much like a puzzle. I had a rubbish bag nearby, so I threw the old flooring into it, swept up any debris, and brought it outside to the trash. So long, destroyed flooring! Step 3: Apply the waterproofing. I completely waterproofed my kitchen with Schluter Ditra membrane. However, that seemed excessive for such a small entryway.
As an alternative, I had some scrap Schluter Kerdi membrane (far thinner and cheaper) and a lot of AquaDefense liquid membrane leftover from my bathroom project, so I decided to try laying down the Kerdi first, followed by a couple coats of the liquid membrane. After sweeping and cleaning the floor, I spread the Kerdi around the area, took a disposable brush, and painted on the AquaDefense. It went on nice and thick, held the Kerdi in place like glue, and only took about an hour between coats. Did I have to apply two coats? Probably not, but I enjoyed having the surface smooth and even.

I did make sure to waterproof the area under the door. The quarter-round that had previously been there plainly provided little protection and had been ruined by dampness, therefore I wanted to ensure that this region was protected if moisture appeared again. Step 4: Mix mortar and lay the tile. See how quickly this project progressed to the fun part?! Once the AquaDefense had dried, I grabbed an old ice cream bucket and a paint stir stick.
Yes, we only use professional equipment here. I used rapid-setting thin set mortar, but follow the mixing instructions for whatever type you use. One method I’ve discovered is to add some water first, then pour in the mortar, and then add more water as needed; this makes it much simpler to stir and achieve an even consistency quickly. Once mine was mixed, I noticed that I had only filled the bucket about a fourth full, which provided plenty of mortar for my needs.
Because the space was so small, I just poured the mortar into a puddle and spread it with my stir stick until it was evenly distributed. The goal is to get it thick enough to cover the floor but not so thick that you can’t see what’s underneath – which was simple to notice because my AquaDefense was blue!
As soon as my mortar was down, I began carrying over my tiles and placing them one by one. I began with the top right tile that was against the door/wall in my cut-out space. I took sure to press down and jiggle this tile to get it to stick in the mortar, and I also left a little space between the tile and the cut flooring, similar to a grout line.
From there, I chose which tiles looked best next to them other and placed them, ensuring that they were evenly spaced for grout lines. If any mortar oozed up between the tiles, I made sure to wipe it down so it didn’t become too high and show through the grout.
After I had all of my tiles in place, I went to my garage and cut the remaining tile in half using a tile saw. (You can hire a tile saw for relatively little.) This was simple enough, and then I placed both cut pieces where they needed to be to finish the puzzle.
After that, I babysat the tiles for a few hours to ensure that no dogs, cats, or children stepped on them and caused damage. This is partly why I use rapid-setting mortar! When I could push on a tile and it didn’t move, I stopped fretting and let the tiles set overnight.\
Step 5: Grout. The next day, I used the same grout on this entry that I did in our kitchen. I don’t have any quick grout tips because it requires patience, which I sometimes lack. Basically, I mixed it in another bucket and then glopped it on, brushing it back and forth across the gaps between tiles until they were all filled in. Sometimes it appears that a gap has been filled, but check the grout lines from a different angle to ensure that there isn’t a concealed pocket of air ready to wreck your day.
For the time being, overlook the outside gaps between the tiles and the remaining flooring. These edges should be caulked rather than grouted since caulk flexes better with any change in the floor. However, there were several areas where the edging left a larger gap than I had anticipated, which I helped fill with additional grout. I also grouted the bigger area between the tile and under our door. I’ll probably likely put quarter-round around this door at some point, but I wanted the added protection of grout as well.
All this grouting does create a mess. I believe that is unavoidable. However, once you’ve completed all of the grout lines and allowed it to sit for a while (see your grout’s directions to see how long!), you may begin wiping it off the tiles using a wet sponge from a pail of water. This is both fulfilling and a good way to feel like Cinderella.
Once I was satisfied with my grout job between the tiles, I took a break and allowed the grout to set. However, even if you wash it off repeatedly, a grout layer will remain. So I kept my sponge damp and continued washing the dried grout from my tiles.
And here’s a good tip! When there is only a faint film of grout on the tiles, I use a baby wipe to clean it away. I can’t explain the chemistry behind the chemicals used, but I swear these baby wipes work better than anything else I’ve tried to remove grout film!
Step 6: Caulk the edges. This final step adds the finishing touch. If any of your cuts were a little crooked, smooth caulk lines can camouflage them. I had white caulk that was the same color as my grout, so it all blended together and looked the same.
I used my caulk gun to apply a (semi-)even line of caulk to fill the gap between my tiles and the existing floor. Then I used another baby wipe to smooth the caulk around and along my outline. In a couple areas, it got on my tile and/or old flooring, so I just wiped it off and kept going. This took some time, but when I finished, it looked great.
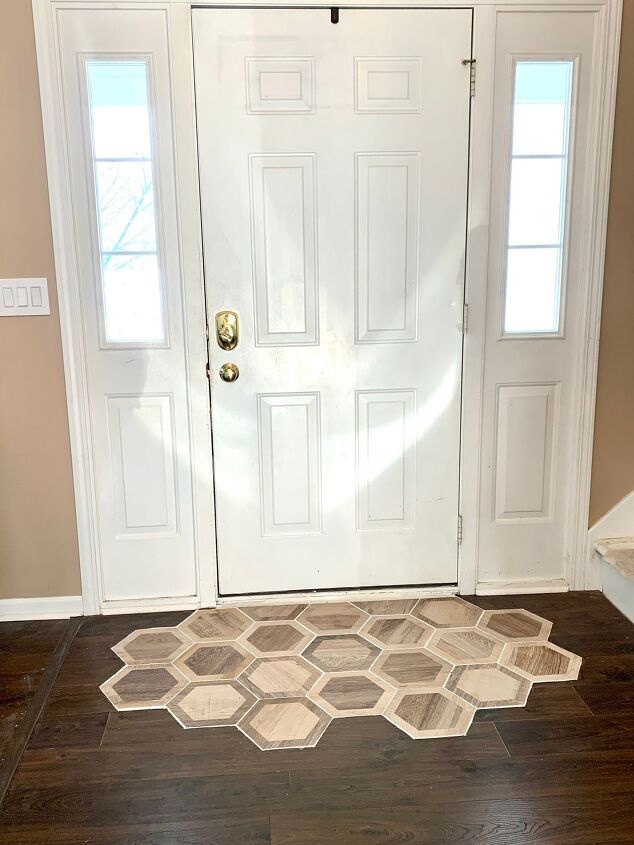
That is it! Instead of a destroyed floor beneath a mat, we have a cool floor that can stand on its own. We’ve already taken off several snow-covered shoes here, and it’s a fantastic technique to avoid getting a rug muddy or sopping wet. Let’s focus on the shoes.